
If you’ve followed this series, you’re probably typing IP addresses and port numbers into your browser more often than you’d like. Every self-hosted service has its own address, whether that’s Gitea, Nextcloud, Immich, Home Assistant, or Jellyfin. As your homelab grows, those addresses become harder to remember, bookmark, and share.
A reverse proxy fixes that by giving every service its own memorable hostname while providing a single entry point for your homelab. Instead of remembering where each application lives, you’ll access them through clean addresses like git.home.arpa and cloud.home.arpa. Combined with Pi-hole, every device on your network resolves those names consistently, regardless of what your router supports.
| Before | After |
| 192.168.1.102:3000 | git.home.arpa |
| 192.168.1.102:8080 | cloud.home.arpa |
| 192.168.1.102:8096 | photos.home.arpa |
| 192.168.1.102:8123 | home.home.arpa |
The improvement isn’t just cosmetic. Every application sits behind the same access layer with a predictable URL. Whether the backend is a Docker container, a Kubernetes service, or a process running directly on the host no longer matters. You access everything the same way, while Caddy handles routing requests to the correct destination.
By the end of this guide, you’ll access Gitea at https://git.home.arpa, Nextcloud at https://cloud.home.arpa, Immich at https://photos.home.arpa, Home Assistant at https://home.home.arpa, and every future service using the same pattern.
How This Fits Into the Series
Up to this point, you’ve been deploying services one at a time. This article introduces the access layer that ties everything together.
Each component has a distinct responsibility:
- Pi-hole resolves hostnames like
git.home.arpato the IP address of the node running Caddy. - Caddy (this article) receives incoming requests and routes them to the correct backend based on the requested hostname.
- Cloudflare Tunnel securely publishes selected services to the public internet without opening router ports.
- WireGuard and Tailscale provide secure remote access to your homelab over a private network.
Throughout this guide, we’ll use home.arpa as the internal domain, but the same architecture works with any domain you own.
From this point onward, every self-hosted application in this series follows the same workflow:
- Create a DNS record in Pi-hole.
- Attach the application’s container to the shared
proxynetDocker network. - Add a matching site block to the Caddyfile.
- Access the application through its hostname instead of an IP address and port.
Step 2 is the one most people miss, and it’s the single most common reason a reverse proxy “just doesn’t work.” We’ll explain exactly why in Part 2.
Part 1: One Hostname Per Service
As your homelab grows, so does the number of addresses you need to remember. Gitea might be running on one port, Nextcloud on another, Immich on a third, and Home Assistant on yet another. Every new application adds another IP address and port to memorize, bookmark, and share.
A reverse proxy solves this by placing a single access layer in front of every service. Instead of remembering where each application lives, you access everything through a memorable hostname: git.home.arpa for Gitea, cloud.home.arpa for Nextcloud, photos.home.arpa for Immich, and home.home.arpa for Home Assistant.
When you visit one of those hostnames, the reverse proxy examines the request and forwards it to the correct backend automatically. That backend can be a Docker container, a Kubernetes Service, or a process running directly on the host. The application behind the proxy no longer matters because every request follows the same path.
This separation is what makes reverse proxies so useful. Applications can move between machines, containers, or even orchestration platforms without changing how users access them. As long as Caddy knows where the backend lives, clients continue using the same hostname.
The important idea is the architecture, not the software. We’ll use Caddy throughout this series because it automatically manages HTTPS, has a simple configuration, and runs natively on ARM. You could build the same architecture with Nginx, Traefik, or another reverse proxy. What matters is adopting a one-hostname-per-service model, not the specific proxy you choose.
Why home.arpa Instead of .local
Many homelabs use .local because it seems like the obvious choice. Unfortunately, .local is reserved for multicast DNS (mDNS), which is used by technologies such as Apple’s Bonjour and Linux’s Avahi. Many operating systems treat .local names differently from standard DNS queries, leading to inconsistent or unpredictable name resolution.
Instead, we’ll use home.arpa. It is an IETF-reserved domain specifically intended for private home networks and works with standard DNS without conflicting with mDNS.
If you already own a domain, you can use that instead. For example, git.example.com or grafana.example.com. The important part is choosing a domain that won’t conflict with existing networking protocols.
Part 2: Create the Shared Docker Network First
Before deploying anything, create the Docker network that Caddy and every backend service will share:
docker network create proxynet
This single command is the most important step in this entire guide, and it’s the step missing from most broken reverse proxy deployments.
Here’s why.
Caddy can only forward requests to a container by name, such as reverse_proxy gitea:3000, if Docker’s internal DNS can resolve gitea to an IP address that Caddy can reach. Docker only provides that name resolution for containers connected to the same user-defined network.
If Gitea creates its own private network and never joins proxynet, Caddy and Gitea are effectively isolated from each other. From Caddy’s perspective, the hostname gitea doesn’t exist, so every request fails with a 502 Bad Gateway, regardless of how correct the Caddyfile is.
This is the most common reason a seemingly correct reverse proxy configuration doesn’t work. The application was deployed before proxynet existed, and its Compose file was never updated to join the shared network.
Declare the external network:
networks:
  proxynet:
    external: true
Then attach the service to it:
services:
  your-service:
    networks:
      - proxynet
      # plus any other networks the service already uses
      # such as a private database network
The external: true setting tells Docker Compose that proxynet already exists and should be reused instead of being created automatically. If the network doesn’t exist, docker compose up fails with an error similar to:
network proxynet declared as external, but could not be found
Docker Compose will not create the network for you. That’s why docker network create proxynet is the very first command in this guide.
You only need to create proxynet once on each Docker host. After that, every new service you deploy simply joins the existing network instead of creating its own. From this point onward in the series, we’ll assume proxynet already exists and connect every new service to it.
Part 3: Deploy Caddy with Docker Compose
Now that the shared network is ready, it’s time to deploy Caddy.
The official Caddy Docker image runs natively on ARM, making it an excellent fit for the Turing Pi. We’ll deploy it with Docker Compose, which we installed earlier in this series.
Create a working directory:
mkdir -p ~/docker/caddy && cd ~/docker/caddy
Create a docker-compose.yml file:
services:
  caddy:
    image: caddy:2
    container_name: caddy
    restart: unless-stopped

    ports:
      - "80:80"
      - "443:443"
      - "443:443/udp"

    volumes:
      - ./conf:/etc/caddy
      - caddy_data:/data
      - caddy_config:/config

    networks:
      - proxynet

volumes:
  caddy_data:
  caddy_config:

networks:
  proxynet:
    external: true
Start Caddy:
docker compose up -d
Docker will pull the image, create the named volumes, and start the container. Because proxynet already exists, Compose simply connects Caddy to the shared network instead of trying to create a new one.
[+] Running 4/4
 ✔ Image caddy:2             Pulled
 ✔ Volume caddy_caddy_config Created
 ✔ Volume caddy_caddy_data   Created
 ✔ Container caddy           Started
At this point, Caddy is running but isn’t routing any traffic yet. We’ll configure that in the next section by creating our first Caddyfile.
A few parts of this Compose file are worth understanding:
- The
./confdirectory is mounted as/etc/caddyinside the container. This is where theCaddyfileand any future configuration files live. caddy_datastores TLS certificates and other persistent data so they survive container upgrades and restarts.caddy_configstores Caddy’s runtime configuration.- The
443:443/udpport mapping enables HTTP/3 for clients that support it.
Part 4: Write and Validate Your First Caddyfile
One of Caddy’s biggest strengths is its configuration format. Instead of long configuration files filled with nested blocks and directives, each site is defined in just a few lines: the hostname users visit and the backend that should receive the request.
In Part 3, Docker mounted the host’s ./conf directory into the container as /etc/caddy. That’s where Caddy looks for its configuration.
Create your first Caddyfile:
nano conf/Caddyfile
Every site block follows the same pattern:
service.home.arpa {
    reverse_proxy container-name:port
}
This is a template showing the general structure of a Caddy site block. For example, if you’re publishing Gitea, the configuration would look like this:
git.home.arpa {
    reverse_proxy gitea:3000
}
We’ll use the same pattern for every application in this series.
service.home.arpais the hostname Caddy listens for.reverse_proxy container-name:porttells Caddy where to forward incoming requests.
Notice that the port is the container’s internal listening port, not necessarily the port mapped to the Docker host. Mixing up those two ports is one of the most common causes of 502 Bad Gateway errors.
Validate the Reverse Proxy First
Before configuring Gitea or Nextcloud, it’s worth verifying that Caddy, Docker networking, and your DNS are all working correctly. We’ll do that using a temporary container called whoami, which simply returns information about the request it receives. If you can reach this container through Caddy, you’ve confirmed that the reverse proxy itself is working before introducing any application-specific configuration.
We’ll run whoami in its own Docker Compose project so we don’t modify the Caddy deployment we created earlier.
Create a new directory:
mkdir -p ~/docker/whoami
cd ~/docker/whoami
Create a docker-compose.yml file:
services:
  whoami:
    image: traefik/whoami
    container_name: whoami
    restart: unless-stopped

    networks:
      - proxynet

networks:
  proxynet:
    external: true
Start the container:
docker compose up -d
Now return to the Caddy project:
cd ~/docker/caddy
Open your conf/Caddyfile and add the following site block:
test.home.arpa {
    reverse_proxy whoami:80
}
Reload Caddy to apply the new configuration:
docker compose exec caddy caddy reload --config /etc/caddy/Caddyfile
You’ll see output similar to:
2026/07/21 17:42:37.590 INFO    using config from file  {"file":"/etc/caddy/Caddyfile"}
2026/07/21 17:42:37.591 INFO    adapted config to JSON  {"adapter":"caddyfile"}
You may also see a warning that the Caddyfile isn’t formatted. That’s only a style warning and doesn’t affect functionality.
Once Pi-hole is configured in Part 5 and test.home.arpa resolves correctly, visit:
https://test.home.arpa
If everything is working, you’ll see a simple page showing information about the request received by the whoami container, including its hostname, IP address, and HTTP headers.
Part 5: Configure Local DNS with Pi-hole
At this point, Caddy is ready to route requests for test.home.arpa, git.home.arpa, or any other hostname you configure. The problem is that your devices still have no idea where those names live. If you try to visit https://test.home.arpa now, the request will fail before it ever reaches Caddy because DNS can’t resolve the hostname.
In this section, we’ll use Pi-hole as our local DNS server so every device on your network can resolve your homelab hostnames automatically.
Why Pi-hole Instead of Your Router
Many home routers support local DNS records, but the feature varies widely between manufacturers and firmware versions. Some don’t support it at all, while others have limited functionality or don’t handle subdomains well. Since this series aims to work regardless of which router you’re using, we’ll use Pi-hole instead.
Besides providing consistent local DNS, Pi-hole also gives you network-wide ad blocking and a query log that’s extremely useful when troubleshooting DNS problems.
If you’ve already deployed Pi-hole earlier in this series, you can skip ahead to Add Local DNS Records for Your Services.
Deploy Pi-hole
Create a working directory for Pi-hole:
mkdir -p ~/docker/pihole
cd ~/docker/pihole
Pi-hole needs to listen on the standard DNS port (53) so devices on your network can send DNS queries directly to it. The simplest way to do that in Docker is by using host networking.
Before deploying the container, make sure port 53 isn’t already in use.
Ubuntu runs systemd-resolved by default, which reserves port 53 for its built-in DNS stub resolver. Because Pi-hole also needs port 53, the two can’t use the port at the same time.
Check whether port 53 is already in use:
sudo ss -tulpn | grep :53
If you see systemd-resolved listening on 127.0.0.53:53, disable the stub listener:
sudo nano /etc/systemd/resolved.conf
Set:
DNSStubListener=no
Apply the changes and recreate the resolv.conf symlink:
sudo systemctl restart systemd-resolved
sudo rm /etc/resolv.conf
sudo ln -s /run/systemd/resolve/resolv.conf /etc/resolv.conf
Confirm that port 53 is now available. The following command should return no output:
sudo ss -tulpn | grep :53
Now create a docker-compose.yml file:
services:
  pihole:
    image: pihole/pihole:latest
    container_name: pihole
    restart: unless-stopped
    network_mode: host

    environment:
      TZ: "your_timezone"
      FTLCONF_dns_upstreams: "1.1.1.1;9.9.9.9"
      FTLCONF_webserver_port: "8080"

    volumes:
      - ./etc-pihole:/etc/pihole
      - ./etc-dnsmasq.d:/etc/dnsmasq.d

    cap_add:
      - NET_ADMIN
Replace your_timezone with your local timezone.
Start Pi-hole:
docker compose up -d
Verify the container is running:
docker compose ps
Set a password for the web interface:
docker exec -it pihole pihole setpassword
The Pi-hole web interface is available at:
http://<node-ip>:8080/admin
Add Local DNS Records for Your Services
This is the part that’s specific to this article. Instead of pointing clients directly at each application, every hostname will point to the machine running Caddy. Caddy will then decide which backend application should receive the request.
Open the Pi-hole web interface and navigate to Settings → Local DNS Records. On some versions of Pi-hole, this page appears under Local DNS → DNS Records.
Add an A record for each service you plan to expose:
| Domain | IP Address |
test.home.arpa | Caddy node IP |
git.home.arpa | Caddy node IP |
cloud.home.arpa | Caddy node IP |
photos.home.arpa | Caddy node IP |
home.home.arpa | Caddy node IP |
Notice that every hostname points to the same IP address. Pi-hole isn’t deciding which application to open; it’s simply directing every request to the Caddy server. Once the request reaches Caddy, the Caddyfile examines the requested hostname and forwards traffic to the correct backend container.
Configure Your Network to Use Pi-hole
Next, configure your router’s DHCP settings so it advertises Pi-hole as the DNS server for your network instead of your router or ISP.
The exact location varies between router manufacturers, but you’re typically looking for the Primary DNS Server setting under the router’s LAN or DHCP configuration.
After saving the changes, reconnect your devices to the network, renew their DHCP lease, or simply restart them so they receive the updated DNS server.
Verify DNS Resolution
Before testing Caddy, first confirm that DNS is working correctly.
From a client that’s using Pi-hole for DNS, run:
ping test.home.arpa
or:
getent hosts test.home.arpa
The hostname should resolve to the IP address of the machine running Caddy.
Once DNS is resolving correctly, open:
https://test.home.arpa
If everything is configured correctly, you’ll see a page generated by the temporary whoami container showing details about the request, including the hostname, client IP address, HTTP headers, and reverse proxy information. This confirms that DNS resolution, HTTPS, and reverse proxy routing are all working correctly.
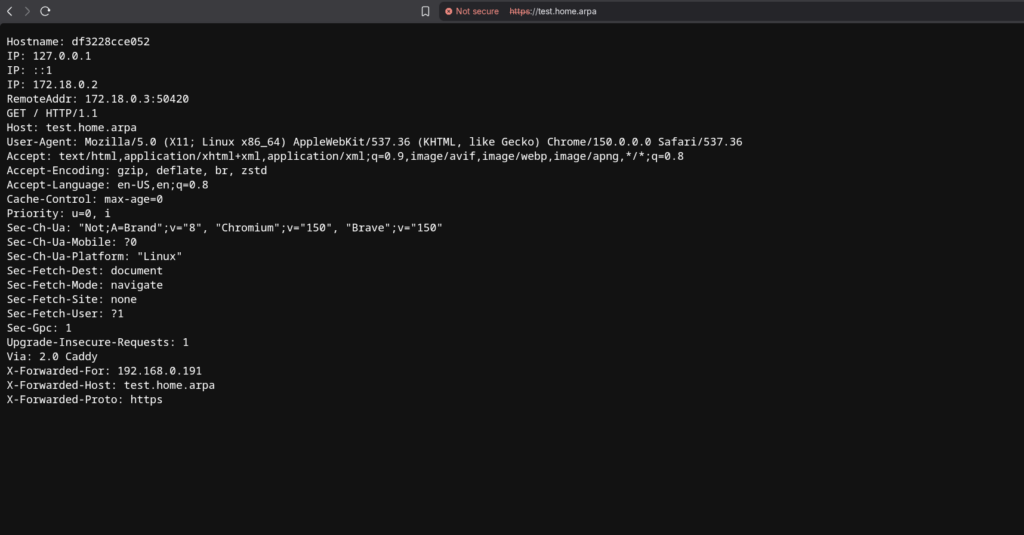
At this point you’ve verified that:
- DNS resolves
test.home.arpato your Caddy server. - Caddy receives the request.
- Caddy can reach containers on
proxynet. - Reverse proxy routing is working correctly.
If a later application doesn’t work, you can focus on that application’s configuration instead of debugging your DNS or reverse proxy setup.
Once you’re satisfied everything is working, stop and remove the temporary whoami container:
cd ~/docker/whoami
docker compose down
You can also remove the temporary test.home.arpa entry from both your Caddyfile and Pi-hole.
Part 6: Deploy Gitea Behind Caddy
If you’re following the Gitea guide from earlier in this series, a few small changes are required before Gitea can be accessed through Caddy.
We’ll make four changes:
- Connect Gitea to
proxynetso Caddy can reach it. - Update Gitea’s public URL to
https://git.home.arpa. - Stop exposing Gitea’s HTTP port directly on the host.
- Keep SSH access unchanged.
Before continuing, make sure you’ve added the following Local DNS record in Pi-hole:
| Domain | IP Address |
git.home.arpa | Caddy node IP |
Update the Docker Compose File
Open your existing Gitea Compose file:
cd ~/docker/gitea
nano docker-compose.yml
Add proxynet alongside the existing private network:
networks:
  gitea:
    external: false

  proxynet:
    external: true
Then update the server service:
services:
  server:
    ...

    environment:
      - GITEA__server__DOMAIN=git.home.arpa
      - GITEA__server__ROOT_URL=https://git.home.arpa/
      - GITEA__server__SSH_DOMAIN=<node-ip>
      - GITEA__server__SSH_PORT=2222
      - GITEA__server__SSH_LISTEN_PORT=22

    networks:
      - gitea
      - proxynet

    ports:
      - "2222:22"
What Changed?
These changes allow Gitea to work correctly behind the reverse proxy.
proxynet was added to the server service.
Without this, the gitea container only exists on its private Docker network. Caddy can’t resolve or connect to it, so requests to:
reverse_proxy gitea:3000
fail with a 502 Bad Gateway or a Docker DNS resolution error.
The database remains on the private gitea network only. Caddy never needs direct access to PostgreSQL.
ROOT_URL now points to the public HTTPS address.
Previously, Gitea believed it was running at:
http://<node-ip>:3000/
Now it knows its public address is:
https://git.home.arpa/
Although Caddy handles HTTPS, Gitea still uses ROOT_URL when generating redirects, clone URLs, avatar links, webhook URLs, and when validating CSRF requests. If this value still points to the old address, the reverse proxy may appear to work while logins, redirects, assets, or form submissions fail.
The HTTP port mapping was removed.
Since Caddy is now the public entry point, Gitea no longer needs to expose port 3000 on the host.
If you ever need to troubleshoot Gitea directly, temporarily add:
ports:
  - "3000:3000"
back to the server service, then access:
http://<node-ip>:3000
Remember that Gitea will still generate links using ROOT_URL, so this is mainly useful for confirming the application itself is healthy.
SSH remains unchanged.
Only the web interface moves behind Caddy.
Git operations over SSH continue to connect directly to:
<node-ip>:2222
Caddy only proxies HTTP and HTTPS traffic.
Configure Caddy
Add a matching site block to ~/docker/caddy/conf/Caddyfile:
git.home.arpa {
    reverse_proxy gitea:3000
}
Save the file, then recreate the Gitea container and reload Caddy:
cd ~/docker/gitea
docker compose down
docker compose up -d

cd ~/docker/caddy
docker compose exec caddy caddy reload --config /etc/caddy/Caddyfile
Verify Everything Is Working
The quickest way to confirm that Caddy can reach Gitea is to test the connection from inside the Caddy container:
docker exec caddy curl http://gitea:3000
If everything is configured correctly, you’ll receive Gitea’s HTML response.
Finally, open:
https://git.home.arpa
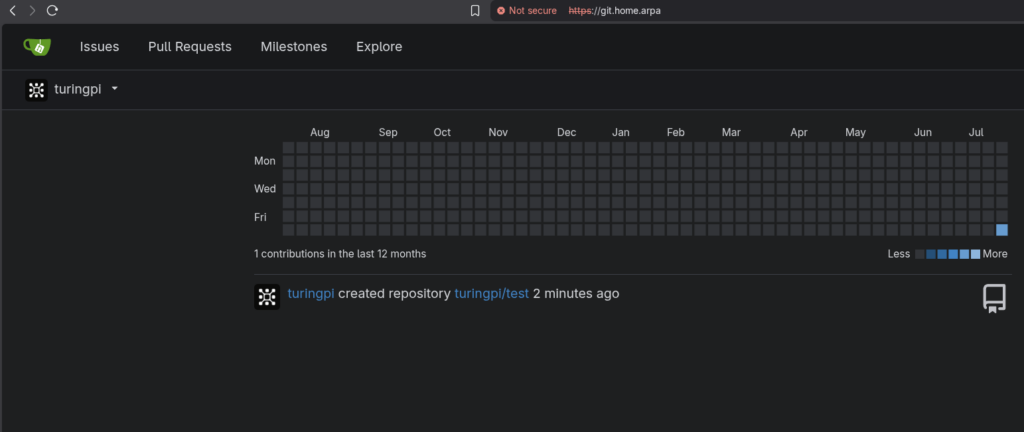
You should see the Gitea login page loading over HTTPS with working redirects, CSS, JavaScript, and login functionality.
Part 7: Applying the Same Pattern to Other Services
At this point, you’ve seen the complete process with Gitea. Every additional application follows the same four-step process introduced earlier. The only difference is that some applications require additional reverse proxy settings.
Common Application Settings
Some applications require a few additional settings when they’re placed behind a reverse proxy.
Nextcloud
Besides joining proxynet, Nextcloud requires several reverse proxy settings:
- Add
cloud.home.arpatoNEXTCLOUD_TRUSTED_DOMAINS. - Set
OVERWRITEPROTOCOL=https. - Set
OVERWRITEHOST=cloud.home.arpa. - Set
OVERWRITECLIURL=https://cloud.home.arpa. - Configure
TRUSTED_PROXIESusing the subnet of yourproxynetDocker network.
Without these settings, you’ll typically see an “Access through untrusted domain” error, incorrect redirects, or every client appearing to come from the proxy container’s IP address.
cloud.home.arpa {
    reverse_proxy nextcloud:80
}
Immich
Attach only the immich-server container to proxynet. The machine learning, Redis, and database containers don’t need to be reachable by Caddy.
photos.home.arpa {
    reverse_proxy immich-server:2283
}
Home Assistant
Home Assistant requires reverse proxy support to be enabled in configuration.yaml.
Configure:
http.use_x_forwarded_forhttp.trusted_proxies
using the subnet assigned to proxynet.
home.home.arpa {
    reverse_proxy homeassistant:8123
}
Jellyfin
Jellyfin is usually the simplest service to place behind Caddy. In most cases, attaching it to proxynet and adding a site block is all that’s required.
media.home.arpa {
    reverse_proxy jellyfin:8096
}
Whenever you’re unsure whether an application needs additional reverse proxy configuration, check its documentation for terms such as:
- Reverse Proxy
- Trusted Proxies
- Trusted Domains
- Base URL
- External URL
- Public URL
- X-Forwarded-For
Most modern self-hosted applications document these settings explicitly.
The important takeaway is that the networking pattern never changes:
- Pi-hole resolves the hostname.
- Caddy receives the request.
- Docker networking connects Caddy to the application.
- The application knows its public hostname and trusts the reverse proxy.
Part 8: The Backend Doesn’t Matter
Although this article used Docker examples, the reverse proxy pattern isn’t tied to Docker. Caddy only needs a reachable IP address and port. It doesn’t care whether the application is running in a Docker container, a Kubernetes cluster, or directly on the host.
For example, Gitea running in Docker and Grafana running in Kubernetes can both be served from the same Caddyfile:
git.home.arpa {
    reverse_proxy gitea:3000
}

grafana.home.arpa {
    reverse_proxy 192.168.0.184:31900
}
In this example:
gitea:3000is a Docker container reached through Docker’s internal DNS.192.168.0.184:31900is a Kubernetes NodePort service.- For this example we’re using a NodePort because it’s simple. In production you may instead use a MetalLB LoadBalancer IP or another address reachable by Caddy.
From Caddy’s perspective, they’re just two different backend addresses.
If you’re exposing Kubernetes services, use a NodePort or a MetalLB LoadBalancer IP that’s reachable from the machine running Caddy. Internal ClusterIP services aren’t accessible from outside the cluster.
The pattern never changes:
- Create a DNS record pointing to the Caddy server.
- Make sure Caddy can reach the backend.
- Add a
reverse_proxydirective.
Everything else is application-specific.
Part 9: Automatic HTTPS
One of Caddy’s biggest advantages is that HTTPS works automatically. Once you’ve configured a site block, Caddy automatically manages HTTPS for both public and internal domains.
If you’re using a public domain that points to your homelab, Caddy automatically requests a trusted certificate from Let’s Encrypt and renews it before it expires. There’s no need for Certbot, cron jobs, or manual certificate management.
For internal domains such as .home.arpa, public certificate authorities can’t verify ownership because the domain isn’t publicly resolvable. In this case, Caddy automatically creates its own local Certificate Authority (CA) and uses it to issue certificates for your internal services.
The first time you visit a .home.arpa site, your browser will warn that the certificate isn’t trusted. That’s expected. Once you trust Caddy’s local root certificate, every service it manages will use trusted HTTPS.
Export the root certificate from the Caddy container:
docker exec caddy cat /data/caddy/pki/authorities/local/root.crt > caddy-root.crt
Then import caddy-root.crt into your operating system’s trusted certificate store.
The exact process differs between operating systems:
- Windows: Import the certificate into the Trusted Root Certification Authorities store.
- macOS: Open the certificate in Keychain Access, then set its trust level to Always Trust.
- Linux: Import the certificate into your distribution’s system trust store.
After trusting the certificate, reload your browser. Every service served by Caddy, such as:
https://git.home.arpahttps://cloud.home.arpahttps://photos.home.arpa
will load over HTTPS without certificate warnings.
The certificate only needs to be trusted once per device. Any additional internal hostnames signed by Caddy’s local CA will be trusted automatically.
Part 10: Local vs Public Access
Throughout this article we’ve used internal hostnames such as git.home.arpa. These services are only reachable from your local network because Pi-hole resolves them to private IP addresses.
If you want to expose a service to the internet, the overall pattern doesn’t change. The only differences are how DNS resolves the hostname and how requests reach Caddy.
Local (.home.arpa) | Public (example.com) | |
| DNS | Pi-hole | Public DNS provider |
| IP Address | Private | Public |
| Reachability | Local network | Internet |
| Router | No port forwarding | Port forwarding or Cloudflare Tunnel |
| HTTPS | Caddy Local CA | Let’s Encrypt |
Whether the request originates from your LAN or the public internet, Caddy still receives the request and routes it using the same Caddyfile.
For example:
git.home.arpa {
    reverse_proxy gitea:3000
}

git.example.com {
    reverse_proxy gitea:3000
}
Only the hostname and DNS resolution change. The reverse proxy configuration remains identical.
When to Use Cloudflare Tunnel
If you only need to expose one or two applications to the internet, Cloudflare Tunnel is often the easiest solution. It avoids opening ports on your router while still providing secure remote access.
If you’re hosting multiple public services on your own domain, Caddy becomes the better long-term solution. It automatically manages HTTPS, lets you route many hostnames from a single configuration, and gives you complete control over how incoming traffic is handled.
The two approaches also work well together.
For example, you might use:
.home.arpafor local-only services using Pi-hole.git.example.comexposed publicly through Cloudflare Tunnel.docs.example.comserved directly by Caddy with Let’s Encrypt.
The reverse proxy pattern you’ve learned in this article stays exactly the same. Only the path clients take to reach Caddy changes.
Troubleshooting
502 Bad Gateway
Caddy can’t reach the backend service.
Check that:
- the application is attached to
proxynet - the container is running
- you’re using the container’s internal port, not a host-mapped port
docker network inspect proxynet
docker exec -it caddy curl http://<container>:<port>
Hostname doesn’t resolve
The device isn’t using Pi-hole or the DNS record doesn’t exist.
Verify:
- the Local DNS Record exists in Pi-hole
- your device is using Pi-hole as its DNS server
- the DNS cache has been refreshed if needed
Certificate warning for .home.arpa
This is expected until you trust Caddy’s local Certificate Authority.
Export the root certificate from the Caddy container and import it into your operating system’s trusted certificate store.
Application redirects to the wrong URL or login fails
Many web applications need to know their public hostname when running behind a reverse proxy.
Look for settings such as:
- Public URL
- External URL
- Trusted Domains
- Trusted Proxies
- Base URL
Refer to your application’s documentation for the appropriate configuration.
proxynet doesn’t exist
If Docker reports:
network proxynet declared as external, but could not be found
create it once:
docker network create proxynet
Caddyfile changes don’t take effect
Reload Caddy after editing the configuration:
docker compose exec caddy caddy reload --config /etc/caddy/Caddyfile
What You’ve Built
By following this guide, you’ve created a reusable access layer for your homelab.
Instead of remembering IP addresses and ports, every service is now available through a consistent hostname. Pi-hole resolves those hostnames, Caddy routes each request to the correct backend, and HTTPS is handled automatically.
More importantly, you’ve built a pattern that scales. Whether your next application runs in Docker, Kubernetes, or directly on the host, the process stays the same:
- Deploy the application.
- Make it reachable by Caddy.
- Create a DNS record.
- Add a
reverse_proxyentry.
From this point on, adding a new service usually takes just a few minutes.
This access layer becomes the foundation for every self-hosted application you deploy, keeping your homelab organized, predictable, and much easier to manage as it grows.
Related Articles
- Turing Pi 2.5 Complete Setup Guide – Build the ARM cluster this reverse proxy runs on.
- Pi-hole + Tailscale on Turing Pi – Set up the local DNS server used throughout this guide.
- Gitea on Turing Pi: Self-Hosted Git Server on ARM64 – Deploy the Git server used as the reverse proxy example.
- Self-Hosted Nextcloud on Turing Pi with NVMe – Deploy your own private cloud storage behind Caddy.
- Self-Hosted Apps on Turing Pi 2.5 – Discover more applications you can expose using the same reverse proxy pattern.
- Expose Self-Hosted Services with Cloudflare Tunnel – Securely publish selected services to the internet without opening router ports.
- Monitoring a Turing Pi Cluster with Prometheus and Grafana – Learn how to expose Kubernetes services through the same Caddy instance.
FAQ
What is a homelab reverse proxy?
A reverse proxy sits in front of your self-hosted applications and routes incoming requests to the correct backend based on the requested hostname. Instead of remembering IP addresses and ports, you access services through clean, memorable names like git.home.arpa or cloud.home.arpa.
Why isn’t my reverse proxy working even though the Caddyfile looks correct?
The two most common causes are:
- The backend container isn’t attached to the same Docker network as Caddy, so Caddy can’t reach it.
- The application is still configured with its old hostname or URL, causing redirects, broken assets, or login issues.
Verify that Caddy can reach the backend container directly, then check the application’s reverse proxy settings.
What is the difference between Caddy and Nginx?
Both are powerful reverse proxies, but Caddy automatically provisions and renews HTTPS certificates with minimal configuration. For internal services, it can also issue certificates using its own local Certificate Authority. Nginx typically requires separate certificate management, such as Certbot.
Do I need Pi-hole to use Caddy?
No. Caddy works with any DNS server capable of resolving your chosen hostnames to the machine running Caddy. This guide uses Pi-hole because it’s easy to configure, supports local DNS records, and provides consistent behavior across every device on your network.
Can Caddy proxy both Docker and Kubernetes services?
Yes. Caddy only needs a reachable IP address or hostname and a port. Whether the backend runs in Docker, Kubernetes, or directly on the host doesn’t matter.
Why use home.arpa instead of .local?
home.arpa is the IETF-recommended domain for private home networks (RFC 8375). .local is reserved for Multicast DNS (mDNS) and is used by technologies such as Bonjour and Avahi. Using .local for standard DNS records can lead to name resolution conflicts.
Does Caddy automatically renew HTTPS certificates?
Yes. For public domains, Caddy automatically requests and renews certificates from Let’s Encrypt. For internal domains such as .home.arpa, it automatically creates and manages certificates using its own local Certificate Authority.
What’s the difference between a reverse proxy and Cloudflare Tunnel?
A reverse proxy routes traffic to services that are already reachable by the machine running Caddy. Cloudflare Tunnel securely exposes selected services to the public internet without requiring port forwarding. The two complement each other and can be used together.