
GitHub and GitLab are where many homelab users keep the most important parts of their infrastructure: Kubernetes manifests, Ansible playbooks, Docker Compose files, and infrastructure code. Yet unlike the services those files describe, the repositories themselves often live on someone else’s infrastructure.
Once you’ve started self-hosting the rest of your homelab, that exception becomes harder to justify.
Gitea solves that problem. It’s a lightweight self-hosted Git server that runs comfortably on a single RK1 node, giving you private repositories, a familiar web interface, SSH and HTTPS access, issue tracking, and optional CI in just two containers. Your repositories stay on hardware you control while integrating with the same Git workflows you already use.
This guide covers deploying Gitea with PostgreSQL on a single RK1 node with all repository data stored on NVMe, configuring secure SSH access on a non-standard port, validating a complete Git workflow from clone through push, and migrating existing repositories from GitHub or local projects. It also prepares Gitea as the source of truth for a future GitOps workflow.
Part 1: Why Self-Host a Git Server
The biggest reason to self-host a Git server is control. Your code, issue history, commit metadata, Kubernetes manifests, and automation scripts all stay on hardware you own. Your repositories remain available even if your internet connection drops or GitHub has an outage, and you’re not relying on someone else’s infrastructure for projects your homelab depends on.
You also remove many of the limits that come with hosted platforms. Gitea doesn’t care how many private repositories or collaborators you have, and you control authentication, webhooks, integrations, and backup policies instead of waiting for features or pricing decisions from a hosted service.
The tradeoff is that you’re now responsible for the server itself. Updates, backups, monitoring, and uptime become part of your own infrastructure. If you’re already running self-hosted services on a Turing Pi cluster, though, Gitea is just another lightweight service to manage rather than a significant operational burden.
Part 2: Gitea vs the Alternatives
| Gitea | GitLab CE | Forgejo | |
| Resource overhead | Runs comfortably at well under 1 GB RAM for a small instance | Official docs put the single-node baseline at 8 vCPU / 16 GB RAM, with a documented floor of 8 GB in a memory-constrained configuration | Same Go codebase lineage as Gitea; comparable footprint |
| ARM64 support | Official multi-arch images (amd64/arm64/riscv64) via docker.gitea.com/gitea | Documented as supported at the requirements level, but the official Docker image has historically been x86-only, with community ARM builds filling the gap | Official multi-arch images (amd64/arm64) via codeberg.org/forgejo/forgejo |
| Feature set | Repos, issues, pull requests, wiki, package registry, Actions CI | Full DevSecOps suite: CI/CD, container scanning, compliance, enterprise auth | Same core set as Gitea, plus opt-in ActivityPub federation and its own Actions runner track |
| Setup complexity | Two containers, one Compose file, ~10 minutes | Omnibus install or Helm chart bundling PostgreSQL, Redis, and Gitaly | Same as Gitea: two containers, one Compose file |
GitLab CE is the wrong fit for an 8 GB RK1 node. Even GitLab’s own memory-constrained guidance lists 8 GB of RAM as the practical minimum, leaving little room for the operating system or any other self-hosted services. Its integrated DevSecOps platform is excellent for larger teams and enterprise environments, but it’s unnecessarily heavy for a homelab Git server.
Forgejo is the closest alternative to Gitea. While the two projects began from the same codebase, they’ve gradually diverged since the fork, with independent release cycles and feature development. Forgejo has focused on community governance, ActivityPub federation, and its own Actions runner ecosystem, while Gitea has continued with a company-backed development model and a larger ecosystem of documentation and community guides.
For most homelab users, either project is a solid choice. This guide uses Gitea because its documentation is more extensive, its deployment is well established, and it’s easier for readers to troubleshoot using official resources. If you prefer Forgejo, the deployment process is nearly identical: in most cases, only the container image and environment variable prefix need to change.
Part 3: Deploy Gitea with PostgreSQL
NVMe storage is already partitioned, formatted, and mounted at /mnt/nvme from the previous Nextcloud guide. Create a dedicated directory for Gitea, then create a Compose file for the deployment:
sudo mkdir -p /mnt/nvme/gitea/data /mnt/nvme/gitea/postgres
sudo chown -R 1000:1000 /mnt/nvme/gitea

mkdir ~/gitea
cd ~/gitea
nano docker-compose.yml
Paste the following configuration into docker-compose.yml:
# docker-compose.yml
networks:
  gitea:
    external: false

services:
  server:
    image: docker.gitea.com/gitea:1.26.4
    container_name: gitea
    restart: unless-stopped
    environment:
      - USER_UID=1000
      - USER_GID=1000
      - GITEA__database__DB_TYPE=postgres
      - GITEA__database__HOST=db:5432
      - GITEA__database__NAME=gitea
      - GITEA__database__USER=gitea
      - GITEA__database__PASSWD=replace_with_strong_password
      - GITEA__server__DOMAIN=<node-ip>
      - GITEA__server__ROOT_URL=http://<node-ip>:3000/
      - GITEA__server__SSH_DOMAIN=<node-ip>
      - GITEA__server__SSH_PORT=2222
      - GITEA__server__SSH_LISTEN_PORT=22
    networks:
      - gitea
    volumes:
      - /mnt/nvme/gitea/data:/data
      - /etc/timezone:/etc/timezone:ro
      - /etc/localtime:/etc/localtime:ro
    ports:
      - "3000:3000"
      - "2222:22"
    depends_on:
      - db

  db:
    image: docker.io/library/postgres:14
    container_name: gitea-db
    restart: unless-stopped
    environment:
      - POSTGRES_USER=gitea
      - POSTGRES_PASSWORD=replace_with_strong_password
      - POSTGRES_DB=gitea
    networks:
      - gitea
    volumes:
      - /mnt/nvme/gitea/postgres:/var/lib/postgresql/data
Replace replace_with_strong_password in both services with a strong password, and update <node-ip> with the IP address or hostname you’ll use to access Gitea.
PostgreSQL is the better choice for anything beyond a quick test deployment. Gitea’s documentation recommends SQLite only for small or temporary instances, while PostgreSQL handles concurrent reads and writes far more reliably. That’s especially important if you later adopt a GitOps workflow, where automated reconciliation and your own Git activity may access the database at the same time.
Both persistent volumes live under /mnt/nvme/gitea, keeping repository data and the database off the SD card or eMMC used for the operating system. Both services also use restart: unless-stopped, ensuring the entire stack comes back automatically after a reboot.
You’ll notice there’s no admin username or password in the Compose file. That’s intentional. Gitea creates the administrator account through its first-run setup wizard, so credentials never have to be stored in a Compose file or accidentally committed to version control.
Once you’ve saved the Compose file, start the stack:
docker compose up -d
Part 4: First-Run Setup and Admin Configuration
Open a browser and visit:
http://<node-ip>:3000The first time you access Gitea, you’ll be greeted by the installation wizard. Because the PostgreSQL connection details are already defined in the Compose file, the database fields should be pre-populated. Verify they match your deployment, then continue.
Create your administrator account when prompted. This account has full control over the instance and can create users, repositories, organizations, and system settings.
If this server is intended only for you or your homelab, enable Disable Self-Registration before completing the installation. Doing so prevents anyone on your network from creating an account without your approval.
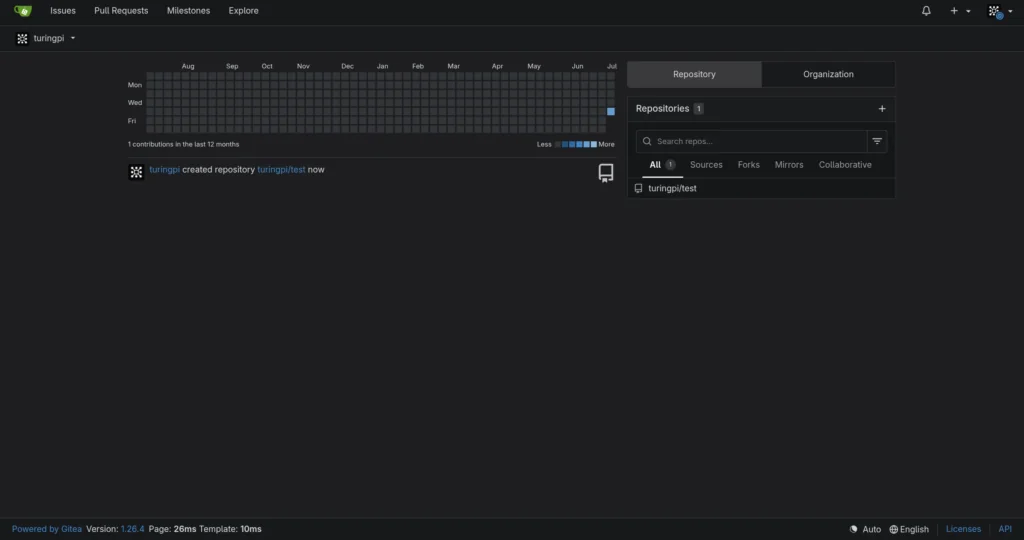
Once installation finishes, sign in and create your first repository. The repository can have any name, as we’ll use it in the next section to configure SSH access and verify the complete Git workflow from clone to push.
Part 5: SSH on a Non-Standard Port
One of the first things you’ll notice is that Gitea’s SSH clone URLs use port 2222 instead of the standard SSH port 22. That’s intentional.
Port 22 on your RK1 node is already occupied by the host’s own SSH daemon, allowing you to continue managing the server normally. Gitea’s built-in SSH server still listens on port 22 inside its container, while Docker maps host port 2222 to the container’s internal port using:
ports:
  - "2222:22"
This keeps the two SSH services separate without any conflicts.
Two environment variables complete the configuration. GITEA__server__SSH_PORT tells Gitea which port to advertise in generated clone URLs, so it’s set to 2222. GITEA__server__SSH_LISTEN_PORT specifies the port Gitea listens on inside the container, which remains 22 to match the Docker port mapping. Changing the internal listening port without updating the port mapping will prevent SSH cloning from working correctly.
Before cloning over SSH, add your public SSH key to Gitea. Click your profile picture in the top-right corner, then navigate to Settings → SSH / GPG Keys → Add Key. Paste the contents of your public key (typically ~/.ssh/id_ed25519.pub or ~/.ssh/id_rsa.pub) and save it.
If you don’t already have an SSH key configured on the computer you’ll use to clone repositories, generate one using your operating system’s standard OpenSSH tools before continuing.
Before cloning a repository, verify SSH authentication is working:
ssh -T -p 2222 git@<node-ip>
The first time you connect, SSH will ask you to verify the server’s fingerprint. Type yes to continue. If everything is configured correctly, you’ll see a message similar to:
Hi there, <your-username>! You've successfully authenticated with the key named workstation, but Gitea does not provide shell access.
This confirms your SSH key has been accepted and Gitea is ready for Git operations.
Now clone your repository over SSH:
git clone ssh://git@<node-ip>:2222/<your-username>/<repository-name>.git
Typing :2222 into every Git command gets old quickly. Instead, configure SSH to use the correct port automatically on the computer you’ll use to clone repositories (such as your laptop or desktop) by creating or editing its ~/.ssh/config file:
nano ~/.ssh/config
Add the following entry, replacing <node-ip> with your Turing Pi node’s IP address:
Host turingpi-git
    HostName <node-ip>
    Port 2222
    User git
Save the file and exit the editor. Any Git commands run from this machine can now use the shorter alias:
git clone turingpi-git:<your-username>/<repository-name>.git
To verify the complete workflow, make a small change to your repository, commit it, and push it back to Gitea:
cd <repository-name>
echo "# My Repository" > README.md
git add README.md
git commit -m "Initial commit"
git push
Refresh the repository page in Gitea. If the new commit appears immediately, your SSH authentication, repository permissions, and Git transport are all working correctly.
If you’d rather not expose Gitea outside your local network, the Cloudflare Tunnel guide shows how to securely publish the service without opening inbound ports on your router.
Part 6: Migrate an Existing Repository to Gitea
Whether you’re migrating an existing Git repository or simply want to start tracking a local project, Gitea makes the process straightforward.
Existing Git Repository
If your project is already managed with Git, create an empty repository in the Gitea web UI without initializing it with a README, .gitignore, or license. Then, from your existing local repository, add Gitea as a new remote and push your current branch:
git remote add gitea ssh://git@<node-ip>:2222/<your-username>/<repository-name>.git
git push -u gitea HEAD
If you’ve configured the optional SSH alias from the previous section, the remote becomes even shorter:
git remote add gitea turingpi-git:<your-username>/<repository-name>.git
git push -u gitea HEAD
Using HEAD automatically pushes your current branch, whether it’s named main, master, or something else.
New Local Project
If your project isn’t already a Git repository, initialize it first:
cd /path/to/your/project
git init
git add .
git commit -m "Initial commit"
git remote add gitea ssh://git@<node-ip>:2222/<your-username>/<repository-name>.git
git push -u gitea HEAD
Import an Existing GitHub Repository
For repositories you don’t own but want to keep locally, Gitea’s built-in migration tool is a better option than manually cloning and pushing. From the Gitea dashboard, click + → New Migration, provide the GitHub repository URL, and Gitea imports the complete repository history. You can also choose to import issues, pull requests, releases, and configure the repository as a scheduled mirror.
The goal isn’t necessarily to replace GitHub. It’s to keep a complete copy of the repositories your homelab depends on under your own control. If GitHub has an outage, a repository is removed, or you simply want everything available on infrastructure you own, your Gitea instance continues to serve as your private Git server.
Part 7: Preparing for a GitOps Workflow
Your Gitea instance is now more than just a place to store code. It can become the source of truth for your entire homelab.
In a GitOps workflow, a GitOps controller continuously watches a Git repository and reconciles your Kubernetes cluster to match whatever is committed. Instead of manually applying manifests with kubectl, you update the repository, commit the change, and let your cluster automatically converge to the desired state.
To prepare for that workflow, create a dedicated repository such as homelab-gitops and store your Kubernetes manifests, Helm values, and infrastructure configuration there. It doesn’t need to be perfectly organized from day one. The important part is keeping your cluster configuration under version control and ensuring the repository is accessible over SSH.
The next guide builds on this foundation by implementing a complete GitOps workflow, where every change committed to this repository is automatically reconciled across your Turing Pi cluster.
Troubleshooting
SSH authentication fails
First, verify that Gitea accepts your SSH key:
ssh -T -p 2222 git@<node-ip>
If authentication is working, you’ll see a message similar to:
Hi there, <your-username>! You've successfully authenticated with the key named workstation, but Gitea does not provide shell access.
If it doesn’t, confirm you’ve added the correct public key under Settings → SSH / GPG Keys in Gitea.
SSH clone fails with “Connection refused”
Check that the Compose port mapping reads "2222:22" and that both containers are running:
docker compose ps
If they’re running, verify that nothing is blocking port 2222 between your client and the Gitea server.
turingpi-git or your SSH alias can’t be resolved
Remember that ~/.ssh/config is local to the computer you’re cloning from, not the machine hosting Gitea. If you’re using the optional SSH alias, make sure the configuration exists on your laptop, desktop, or whichever machine is running your Git commands.
PostgreSQL container exits immediately
This is usually caused by incorrect permissions on the PostgreSQL data directory:
sudo chown -R 999:999 /mnt/nvme/gitea/postgres
(999 is the default postgres user in the official image.) Restart the stack afterwards:
docker compose up -dGitea web UI is inaccessible after a reboot
Confirm both services in your Compose file include:
restart: unless-stopped
Then verify the containers restarted successfully:
docker compose psGit reports “Author identity unknown” when committing
Configure your Git identity on the machine you’re using to commit:
git config --global user.name "Your Name"
git config --global user.email "[email protected]"
Then retry the commit.
Push rejected with “repository not found”
Confirm the repository exists, that you’re pushing to the correct remote URL, and that your Gitea user has write access to the repository. If you’re using an SSH alias, verify that the alias points to the correct <node-ip>.
What You’ve Built
You now have a production-ready Git server running entirely on your own infrastructure. Your repositories, commit history, and development workflow no longer depend on a third-party hosting platform.
Specifically, you’ve built:
- A Gitea instance backed by PostgreSQL and persistent NVMe storage
- Secure SSH-based Git access with public key authentication
- A complete Git workflow that has been validated from clone through push
- A private platform for hosting code, documentation, infrastructure, and Kubernetes manifests
- A Git server that’s ready to become the source of truth for future GitOps deployments
Related Articles
- Turing Pi 2.5 + RK1 Complete Setup Guide: From Unboxing to a Running k3s Cluster – Set up the hardware, operating system, and k3s cluster this guide builds on.
- Self-Hosted Apps on Turing Pi 2.5: 15 Services Worth Running – See where Gitea fits into a complete ARM homelab.
- Ansible on Turing Pi 2.5: Automate Your RK1 Cluster – Store your Ansible playbooks in Gitea and version your infrastructure.
- Self-Hosted Nextcloud on Turing Pi: NVMe, Samba & ARM64 – Reuse the NVMe storage configuration from this guide.
- Immich on Turing Pi: Self-Hosted Google Photos on ARM64 – Another production-ready self-hosted application backed by NVMe storage.
- Best Kubernetes Storage for ARM Homelab: Longhorn, Ceph, OpenEBS & NFS – Learn how to provide persistent storage for Kubernetes workloads running on your cluster.
- Expose Self-Hosted Services with Cloudflare Tunnel on ARM64 – Securely access Gitea and other services without opening inbound router ports.
FAQ
Is Gitea available for ARM64?
Yes. Gitea publishes official multi-architecture Docker images covering amd64, arm64, and riscv64 through a single manifest tag, so Docker automatically pulls the correct image for an RK1 node.
What is the difference between Gitea and GitHub?
Gitea is self-hosted software that runs on hardware you control, while GitHub is a hosted service managed by Microsoft. Gitea gives you full ownership of your repositories, unlimited private repositories, and complete control over your data, while GitHub removes the burden of managing the underlying infrastructure.
Can I use Gitea instead of GitHub?
Yes. Gitea supports the same core Git workflows, including repositories, pull requests, issues, SSH and HTTPS cloning, webhooks, and CI integrations. Many developers use Gitea as their primary Git server, while others use it alongside GitHub for backups, mirrors, or private development.
Does Gitea work with Docker on ARM?
Yes. Gitea’s official Docker images are multi-architecture, and the standard Docker Compose deployment works the same on ARM64 as it does on x86 systems.
What database should I use with Gitea?
PostgreSQL is the recommended choice for anything beyond a quick test deployment. Gitea recommends SQLite only for small or temporary instances, while PostgreSQL provides much better performance and reliability under concurrent workloads.
What is the difference between Gitea and Forgejo?
Forgejo began as a fork of Gitea over governance concerns and has since evolved into an independent project with its own release cycle and feature development. Functionally, the two remain very similar for most homelab use cases, with the biggest difference being their governance models rather than their day-to-day Git features.
Can I migrate from GitHub to Gitea?
Yes. Gitea includes a built-in migration tool that can import a GitHub repository’s complete history and optionally its issues, pull requests, releases, and other metadata. It can also mirror repositories to keep them synchronized automatically.
How much RAM does Gitea need?
Very little. A small Gitea instance typically runs comfortably in well under 1 GB of RAM, making it an excellent fit for an 8 GB RK1 node alongside other self-hosted services.
Can I use Gitea without Docker?
Yes, but Docker Compose is the recommended deployment method in this guide because it simplifies upgrades, backups, and portability.