
An 8GB RK1 node can comfortably handle Home Assistant alongside Pi-hole, Tailscale, Mosquitto, Portainer, and Uptime Kuma while still maintaining the low power profile expected from ARM infrastructure. That is the real appeal of running Home Assistant on Turing Pi 2.5 hardware: the RK3588 has enough headroom to consolidate several self-hosted stacks onto a single node without running into meaningful resource or thermal limitations.
The result is a persistent, always-on automation server that stays entirely local. No cloud dependency, no subscription requirement, and no external service needed for automations to function.
This article walks through deploying Home Assistant on a dedicated RK1 node using Docker Compose on Ubuntu 22.04 ARM64. It assumes you have already completed the Turing Pi 2.5 RK1 setup guide and already have SSH access to the target node.
Quick Overview: Home Assistant on Turing Pi 2.5 RK1
| Component | Details |
| Target Node | Any RK1 node (8GB or 16GB) |
| OS | Ubuntu 22.04 ARM64 |
| Deployment | Docker Compose |
| Image | ghcr.io/home-assistant/home-assistant:stable |
| Networking | Host mode, required for device discovery |
| Persistent storage | Bind mount → ~/homeassistant/config |
| Dashboard port | 8123 |
| Physical devices required | No |
| Prerequisites | SSH access, Docker installed on target node |
By the end you will have Home Assistant running on a dedicated RK1 node with persistent configuration, automatic restart after reboots, and local dashboard access at http://<rk1-ip>:8123 no cloud services, no subscriptions, and no physical smart-home hardware required to get started.
Optional Zigbee and Z-Wave USB passthrough is covered as an extension once the base deployment is confirmed working.
Part 1: Why Run Home Assistant on Turing Pi 2.5
Home Assistant works best as an always-on local service that survives reboots, stays responsive, and runs independently of external cloud platforms. Those requirements align naturally with the RK1. The Rockchip RK3588 has enough compute and memory headroom to run Home Assistant alongside supporting services such as Pi-hole, Mosquitto, Tailscale, or Uptime Kuma without running into meaningful resource constraints.
The Turing Pi 2.5 also makes it easy to dedicate a node entirely to automation workloads while keeping the rest of the cluster isolated. Home Assistant runs here as a single Docker Compose deployment on Ubuntu 22.04 ARM64, not as a distributed workload requiring orchestration layers or cluster management tooling.
That separation is operationally useful. You can reboot, update, or experiment with other nodes in the cluster without interrupting automations, dashboards, or local integrations running on the Home Assistant node.
Part 2: Preparing the RK1 Node
SSH into the RK1 node you are designating for Home Assistant. Install Docker if it is not already present:
curl -fsSL https://get.docker.com | sh
sudo usermod -aG docker $USER
Apply the updated group permissions without rebooting:
newgrp docker
Verify Docker is running:
docker run --rm hello-world
Confirm Docker Compose is available:
docker compose version
Create the directory that will hold both the Compose file and the persistent Home Assistant configuration:
mkdir -p ~/homeassistant/config
cd ~/homeassistant
Part 3: Deploying Home Assistant with Docker Compose
Create the Compose file:
nano ~/homeassistant/docker-compose.yml
Paste the following:
services:
  homeassistant:
    container_name: homeassistant
    image: ghcr.io/home-assistant/home-assistant:stable
    volumes:
      - ./config:/config
    environment:
      - TZ=UTC
    restart: unless-stopped
    network_mode: host
A few decisions are worth noting. network_mode: host allows Home Assistant to participate directly in the local network, which improves compatibility with device discovery protocols used by many smart-home integrations. restart: unless-stopped ensures the container automatically starts after node reboots while still respecting a deliberate docker stop.
Replace UTC with your local timezone. A complete list is available through:
timedatectl list-timezones
Start the deployment:
docker compose up -d
Verify the container is running:
docker ps
You should see a running homeassistant container in the output.
Home Assistant takes 30 to 60 seconds to initialize on first run while it generates its default configuration. Once the startup process completes, open a browser on any device on the same network and navigate to:
http://<rk1-ip>:8123
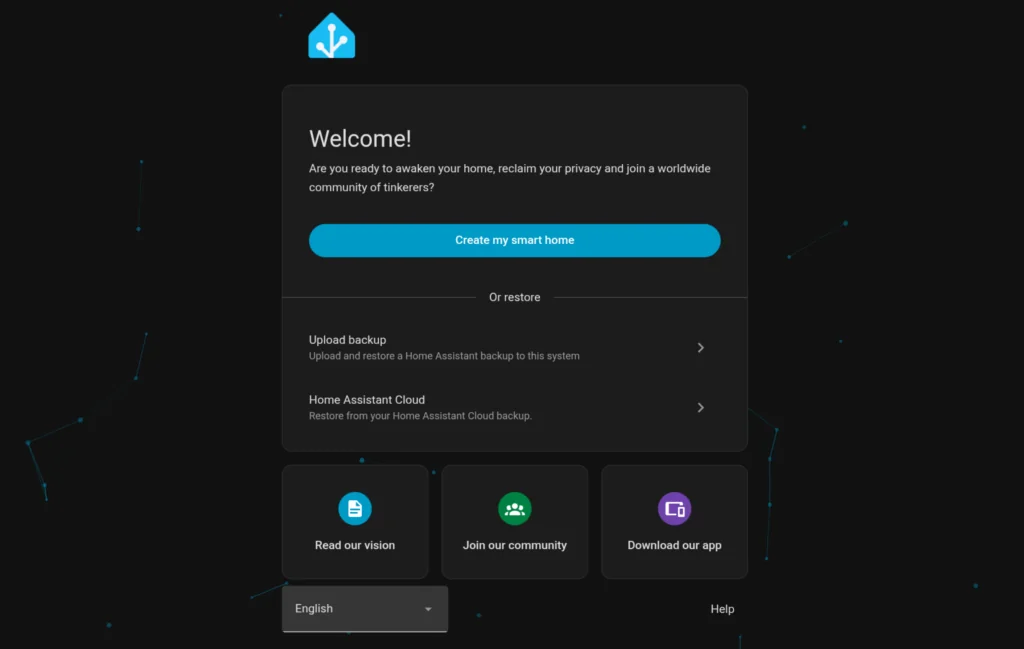
You should see the Home Assistant onboarding screen where you can create your administrator account and complete the initial setup.
Part 4: Verifying Home Assistant Before Adding Any Hardware
Before connecting any physical devices, verify that Home Assistant itself is functioning correctly. This separates deployment issues from hardware-specific problems and makes troubleshooting much easier.
After completing onboarding, navigate to Settings → Devices & Services → Helpers and create a Toggle helper. Home Assistant stores this as an input_boolean entity, which behaves like a virtual switch: it appears in the dashboard, persists across restarts, and can be used as a trigger or condition in automations.
Next, create a simple automation that triggers when the toggle changes state. If the automation runs successfully, you have already verified the dashboard, entity state management, and automation engine without requiring any external hardware.
Home Assistant also includes a Demo integration that provides virtual sensors, lights, and climate devices. Add it through Settings → Devices & Services → Add Integration and search for Demo. The generated entities are useful for verifying dashboard cards, history graphs, and state updates before pairing real devices.
Once you are satisfied that the deployment is healthy, remove the Demo integration and begin adding physical hardware.
Part 5: Persistent Configuration and Recovery
The ./config:/config bind mount stores Home Assistant’s configuration, integrations, and entity data on the host rather than inside the container. This means container updates or recreations do not affect your Home Assistant setup.
You can verify this by restarting the deployment:
docker compose down
docker compose up -d
After Home Assistant starts again, navigate back to http://<rk1-ip>:8123. Your onboarding state, helpers, integrations, and dashboard configuration should still be present.
The restart: unless-stopped policy provides recovery after node reboots. When the RK1 starts, Docker automatically launches Home Assistant without requiring any manual intervention.
Together, persistent storage and automatic restart behavior turn Home Assistant into an appliance-like service rather than a container that requires ongoing management.
Part 6: Optional: Zigbee and USB Passthrough
Home Assistant becomes significantly more useful once physical devices enter the picture. If you later add a Zigbee or Z-Wave coordinator, Docker can pass the USB device directly into the Home Assistant container.
For example:
devices:
  - /dev/ttyUSB0:/dev/ttyUSB0
After restarting the container, Home Assistant can access the coordinator through integrations such as Zigbee Home Automation (ZHA) or Z-Wave JS.
The exact device path depends on the hardware attached to the node and can be identified with:
ls /dev/ttyUSB* /dev/ttyACM*
This article intentionally avoids physical hardware so every step can be reproduced on a fresh RK1 node. Once the base deployment is working, adding Zigbee or Z-Wave devices is a natural next step.
Part 7: Tradeoffs vs Home Assistant OS
Home Assistant OS packages Home Assistant, the Supervisor, and the underlying operating system into a single managed appliance. It provides an integrated update experience and access to the Home Assistant add-on ecosystem without requiring separate container management.
This article uses Docker Compose instead because it fits naturally into a general-purpose Ubuntu environment. Home Assistant runs alongside other services using the same deployment model, logging workflow, and restart policies already used elsewhere in the cluster. Updates are straightforward:
docker compose pull
docker compose up -d
Configuration remains portable because it is stored in the bind-mounted config directory rather than inside the container itself.
The main tradeoff is that Supervisor-managed add-ons are not available. Services such as Mosquitto, Node-RED, Grafana, and Uptime Kuma must be deployed as separate containers instead of being installed through the Home Assistant interface. For users already running Docker-based infrastructure, this is often a reasonable tradeoff in exchange for greater flexibility and transparency.
Part 8: Operational Validation
Before moving on, verify that Home Assistant is running normally.
Check the container status:
docker ps --filter name=homeassistant
You should see the homeassistant container in a running state.
Review the recent logs:
docker logs --tail 50 homeassistant
Look for normal startup messages and ensure there are no repeated error loops or container restarts.
Finally, open:
http://<rk1-ip>:8123
Complete the onboarding process if you have not already done so, then confirm that the dashboard loads correctly and remains accessible after refreshing the page.
To verify recovery behavior, reboot the node:
sudo reboot
Once the node comes back online, wait a minute for Docker to start and confirm the container is running again:
docker ps --filter name=homeassistant
Your Home Assistant configuration, dashboard, and helper entities should still be present.
Part 9: Troubleshooting
Home Assistant is not accessible on port 8123: Confirm the container is running:
docker ps --filter name=homeassistant
If the container is running, verify that network_mode: host is present in the Compose file and that you are connecting to the correct IP address of the RK1 node.
Container repeatedly restarts: Review the logs for startup errors:
docker logs homeassistant
Repeated restart loops usually indicate a configuration or storage issue that prevented Home Assistant from completing initialization.
Configuration directory permission errors: If the config directory was created as root, Home Assistant may be unable to write its configuration files. Fix ownership and restart the container:
sudo chown -R $USER:$USER ~/homeassistant/config
docker compose restart
USB device not found after adding passthrough: Reconnect the dongle and identify the current device path:
ls /dev/ttyUSB* /dev/ttyACM*
Update the Compose file if the device path has changed. USB serial devices may appear as different identifiers after reconnecting or rebooting.
Related Articles
- Turing Pi 2.5 RK1 Complete Setup Guide: Start here if your cluster is not yet configured. This guide covers Ubuntu 22.04 ARM64 installation, networking, SSH access, and the initial cluster setup.
- Turing Pi 2.5 Self-Hosted Apps: Explore additional services that pair well with Home Assistant, including media servers, monitoring tools, and self-hosted infrastructure applications.
- Pi-hole and Tailscale on Turing Pi ARM: Add network-wide DNS filtering and secure remote access. Tailscale provides a simple way to reach the Home Assistant dashboard without exposing it directly to the internet.
- Run LLM Locally on ARM RK3588 with Ollama: Deploy local AI workloads on another RK1 node and explore Home Assistant’s growing support for self-hosted voice and conversation assistants.
- Ansible on Turing Pi 2.5: Automate Your RK1 Cluster with Infrastructure-as-Code: Manage Home Assistant, Docker Compose deployments, and supporting services using repeatable infrastructure automation.
What You’ve Set Up
You now have Home Assistant running on a dedicated RK1 node with persistent configuration, automatic restart behavior, and local network access. The deployment requires no cloud services, no external dependencies, and no physical smart-home hardware to begin experimenting with automations and integrations.
Everything runs inside a standard Docker Compose deployment on Ubuntu 22.04 ARM64. Configuration survives container recreation, Home Assistant automatically starts after node reboots, and the platform can be expanded later with Zigbee, Z-Wave, MQTT, or additional self-hosted services.
For a Turing Pi 2.5 cluster, Home Assistant fits naturally alongside workloads such as Pi-hole, Tailscale, Uptime Kuma, Grafana, and Ollama. The result is a local-first automation platform running on infrastructure you control entirely, with enough headroom to grow as your homelab evolves.
FAQ
Is 8GB enough for Home Assistant?
Yes. Home Assistant typically uses only a small fraction of the available memory on an 8GB RK1 node, leaving plenty of headroom for integrations, history recording, and supporting services such as Pi-hole, Mosquitto, Tailscale, or Uptime Kuma.
Does Home Assistant work on ARM64?
Yes. The official Home Assistant container image includes ARM64 support and runs without modification on RK1 nodes. Deploying Home Assistant on Turing Pi 2.5 hardware is no different from deploying it on any other supported ARM64 Linux system.
Why Docker Compose instead of Home Assistant OS?
Home Assistant OS works well as a dedicated appliance but does not fit naturally into a cluster already running Docker-based workloads. Docker Compose keeps the deployment consistent with everything else on the node.
Do I need physical smart-home devices?
No. The deployment works without any external hardware. The Demo integration and helper entities allow you to verify the dashboard, automations, and state management before purchasing any devices.
Does my configuration survive container recreation?
Yes. All configuration is stored in the bind-mounted config directory on the host. Recreating or upgrading the container does not affect your Home Assistant data.
Can Zigbee USB dongles be passed through to Docker containers?
Yes. Docker supports USB device passthrough through the devices directive in the Compose file. This allows Home Assistant to communicate directly with Zigbee and Z-Wave coordinators attached to the RK1 node.
Can Home Assistant run alongside other services on the same RK1 node?
Yes. Home Assistant has modest CPU and memory requirements. An 8GB RK1 node can comfortably run Home Assistant alongside services such as Pi-hole, Tailscale, Mosquitto, Uptime Kuma, or Portainer.